Sunday, July 1, 2012

DIY Belly Bands

Hi all! As I've embarked on this blogging journey, I've realized I'm not super-disciplined in keeping up with my posts. I really admire those fantastic bloggers that inspire me - maybe someday... Anyhow, in my last post I mentioned that I was going to attempt to make DIY belly bands. After parting with $16.99 for one at Target (which is my favorite, by the way), I decided to upcycle some old bra-top camis that have been languishing in the bottom of my tank top drawer for some time. I'm also kicking myself for giving all of the other ones to Goodwill about 3 weeks prior to embarking on this journey.

Here are the quick and dirty steps I followed:

1.  Select your bra-top camis to dissect. If you don't have any, your local thrift shop might be a good place to look - I almost went to see if I could find mine and buy them back. I suggest bra-top camis because I found that the elastic band at the bottom of the "bra" was useful.


2.  If you have an existing belly band that you like the fit of, measure its height.  For mine this was 10".

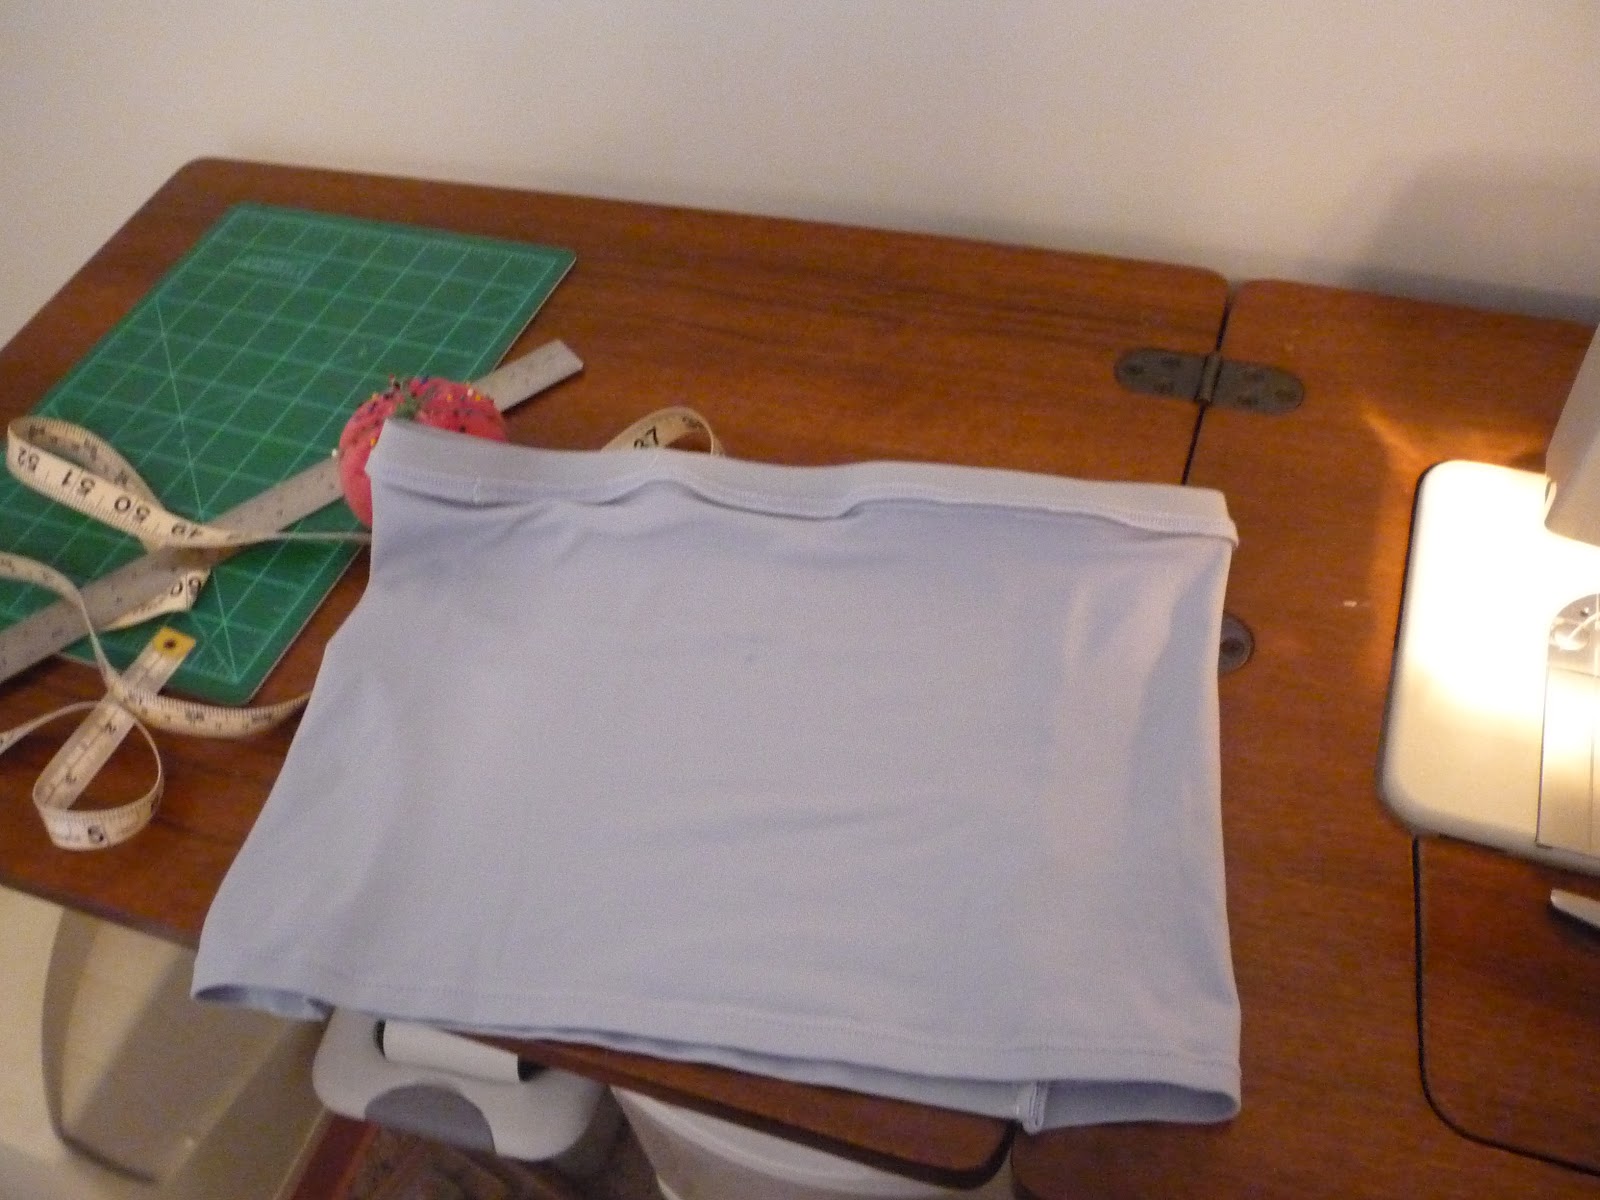
3.  Prepare to cut your camis...First, turn the cami inside out and measure the height you just took onto the cami plus 1" to give yourself a little room for attaching elastic.  Mark with pins or however you normally mark your sewing cuts, then snip away.  After cutting off the tube, also cut the elastic band from the bra top portion of the cami.  You'll end up with something that looks like this:


You'll notice that in this case, the elastic band's circumference is less than the tube's circumference.  In order to correct this, I cut the elastic band on its seam and also the tube on a seam and attached the band to the  tube, than cut off the excess part of the tube.  


Then I sewed the elastic to the unfinished side of the tube portion (the side that you cut) and reattached and sewed the vertical portions together to recreate the tube.


If your tube and elastic are about the same circumference, you'll be able to skip this step and go straight to attaching the elastic band to the unfinished side of the tube, which I was able to do for the second band.

Here are my two finished bands :)


You'll notice that the light blue one is a little rough around the edges - sometimes I have a hard time remembering which side is the right side to sew on.  As long as you put a little thought into it, you won't have the same problem I had.


And if you're wondering why I attached the elastic instead of just finishing the top (cut) edge - it was really just a trial and error decision.  Luckily, I don't think it was an error - when I was still small enough to be able to partially zip my pants, the elastic acted as an anchor when it was used a little above my waist - the finished edge just covered/smoothed out my unbuttoned button under my clothes.  Now that I can't zip at all, I'm using it at the bottom to secure my pants from falling down and the rest still takes care of the smoothing functiuon.  

Are they perfect?  No, I still like my store-bought one better, but for the price, they can't be beat.  My only real complaint is that I have to monitor where my pants are a little closer after standing up from sitting, which I have to do with the other ones anyways, just not as much.


Tuesday, May 1, 2012

It's been a while...

So...my semi-weekly baking episodes didn't go as well as planned.  The brownies were absolutely to die for by the way, and the only thing I've baked since are some muffins and on Sunday I made an apple crisp to go with the vanilla ice cream in the freezer.  I'll try to find some motivation to actually follow through with the baking my way through that still gorgeous book sitting on my counter along with the marzipan I bought in anticipation of baking the cake.

In the meantime, I've been settling in to the first 18 weeks of my first pregnancy :).  That faint little second line is enough to mean pregnant.  I was skeptical at first, but the doctor's office confirmed it later the same day.


So far I've had about 6 tubes of blood taken (I think), peed in many cups, and had one ultrasound.  To date, nothing scary to report.  I've barely begun planning - waiting on May 15 to find out what we're having to really dig in.  That doesn't mean I've completely passed on shopping though...there is a very small stockpile of diapers growing in what will be the baby's room (once we clean all of the other miscellaneous stuff out of it).  I've also purchased some new clothes - hoping to make most of my non-baby wardrobe work with the strategic use of belly bands mixed in with the new clothes.

I've also got a short list of baby projects, which I'm sure will get longer.  First one complete, thanks to a nice afternoon with my fantastic friend Katie.  (Also, my business partner - Happy Frog Kitchen gourmet jams and preserves will start showing up at Upstate SC farmers markets in the next few weeks!)  While she worked on making an adorable fabric flower, I made a countdown shirt, based on the idea I got from the DIY Maternity blog.  Miranda's shirt is way more polished than mine, but for the amount of money and effort I put into mine, I'm happy (more on that below).


I bought a really inexpensive ($3) tank top at Wal Mart and some fabric paint at JoAnn, printed out numbers courtesy of Katie's printer, laid them under the shirt and traced them with a sharpie, then filled them in with fabric paint.  The (low) quality of the shirt allowed me to do this, but I'm considering the freezer paper method that Miranda outlined to make some nicer ones as gifts for future mommies to be.  You can see below, that this shirt is pretty light on the thickness, but for $5 and an hour or so, I'm not complaining.  I'm going to try to keep the photos going, although I'll have the hubby help on the next one (the only way I could get a non-shaky shot was to prop the camera on the jewelry box and use the timer - hence no head).


Speaking of hubby helping...our new fancy stroller arrived yesterday.  He got to put the wheels on and do a quality inspection.  It's a zooper twist, which is pretty much an umbrella stroller on steroids.  The seat back reclines and there's an attachable bug screen, rain shield, sleeping bag...I can't wait to use it!


That's all for now!  Up next on my agenda are some upcycled belly bands from old camis (I hope) and in the near future, a diaper bag - I have the fabric, just have to cut it out and sew.
 

Saturday, January 14, 2012

New Year, New Adventures...or Baking Weekend #1

I have to confess - I really don't like to bake. However, when I saw the book Baking Style: Art, Craft, Recipes by Lisa Yockelson I was so intrigued, I added it to my Christmas wish list.  Lo and behold, my parents saw fit to gift this beautiful book to me, and so begins our journey.


I really enjoyed both the book and the movie Julie & Julia and was inspired to embark on a similar adventure with my book.  I'm hoping to spend most weekends this year baking one recipe from this book and I'll share my adventures.

The first recipe in the book is titled "Forever Brownies" and if you're anything like me, a recipe that has three different kinds of chocolate in it can't be bad. Only having experienced baking boxed brownies, the list of ingredients was a little daunting - 3 different chocolates and 2 kinds of flour plus all the other ingredients - where did Ms. Yockelson come up with this?


Confession #1 - I do not own a sifter.  Instead of sifting twice onto waxed paper like the recipe calls for (also do not currently have waxed paper on hand), I put all of the dry ingredients in a bowl and stirred really good with a whisk.  Hopefully that's sufficient...


Next came all of the melting (butter and chocolate, separate in the picture below - turns out this is fantastically luscious looking mixture when completely combined - and mixing.


Eggs were gently stirred, then combined with sugar.  Confession #2 - I do not have superfine sugar in the house - also required by the recipe - hopefully standard issue will do.


Melted chocolate and butter were added, then the dry ingredients and voila, batter complete - note chocolate on mixer - my had to have after wedding from our Kohl's registry is no longer countertop art.


I was so excited after I got this into the pan that I forgot to take a picture before I put it in the oven. (The pan was purchased yesterday at Marshall's for $4.99, there will probably be several more of these kinds of purchases this year, since I also don't own a bundt pan and other things I'm sure extra fancy baking requires.)  I did taste test before these went in the oven and the batter is absolutely to die for.  Nothing like the watery stuff you get when you make brownies from a box.  It's velvety, chocolatey, and just sweet enough.  If it was whipped more it would be a delightful mousse, except for the raw eggs anyway...

The brownies are now out of the oven and cooling on the rack before heading to the refrigerator for four hours.  It's going to be torture to wait  to taste them, that's for sure, but I'm sure worth every second.


Next up... "A Noble Marzipan Cake" This is terrifying since I have no idea where I might find marzipan, let alone good marzipan in the Upstate of SC.  If anyone has ideas, please let me know :)

Monday, January 2, 2012

The Aftermath...

Where does time go?  My husband and I made our trek north to PA for the holidays and spent a wonderful, if hectic, week visiting family and friends.  Oh, and there was also a stop in Buffalo for a hockey game - our shared passion.  I could probably write a separate blog just discussing our love for all things Sabres, but I digress.

I'll take a step back and recap all the madness that led up to the holiday.  As previously mentioned, I baked.  I never bake.  I learned that Hello Dolly bars are possibly the easiest cookie in the world to make (and also one of my hubby's favorites).  I also made some chocolate mint shortbread bars and chocolate mint meringues.  All of the above will stay in next year's cookie repertoire. (Read no rolling pins and minimal flour all over my counters.)

I also made several things, some successful, others not so much.  For the immediate family, I made Dutch Apple Jam and Pickled Cabbage & Peppers.


I also made the gift bags that these were packaged in...


I'll stop here.  Note to self, while sewing gift bags is economical, it is hugely time consuming.  I made seven large bags and 17 small ones for apple jam to give to friends.


This cut into my sewing time for monster backpacks and the should have been cute stuffed horse for our nieces and nephew.  I succeeded in completing one monster backpack, which became my niece Keely's birthday present.  Next year Piper and Maddox are on the list for their own.


I won't even get into the horse.  It should have been a perfectly sweet little equine, but came out looking like a cross between a hippo and a giraffe.  I cut this from a pattern and followed instructions.  Not sure what went wrong, but it became a dog toy, which was promptly slobbered on, tossed in the air, and unstuffed.

Speaking of dogs, I also made dog biscuits.  We have friends and family with allergic pets and I found a super easy recipe that uses peanut butter, oats, honey, water and low-sodium bullion.  These things were a huge hit, despite the fact that I had to replace the honey with molasses after exploding the honey all over the microwave (who knew 20 seconds was too long).

We came home to South Carolina on the 30th, and spent a laid-back New Year's Eve at our friends Mike & Katie's home.  This year's highlight may have been Alicia's sparkler twirling during/after the big fireworks.  That and the campfire.  Oh, and Katie's homemade marshmallows with chocolate fondue and goat cheese crostini with pear & rosemary jam.  I could have eaten them all.

New Year's Day started with breakfast in bed for me and was followed by a traditional "northern" New Year's meal (kielbasa, sauerkraut, pierogies...) at Kate and Dave's house.

If the rest of 2012 follows the way it started, we're in for another fantastic year.

Thursday, December 15, 2011

Countdown to Christmas

I, like many of you, am wondering where the heck all of the time went this year.  I've made many incredible changes this year, the most significant being leaving a full time corporate job.  I was burned out and on the verge of complete mental collapse.  So, in July, I finally cut the apron strings and have been relearning what a balanced existence feels like, and boy does it feel good!

I've started an Etsy shop - see the fantastic little gadget to the right - it's not highly stocked right now, but this time next year...I can hardly wait to get all of the ideas out of my head and into reality!  I'm also in the process of launching a food-based business with one of the most fantastic people I've met since moving to the wonderful state of South Carolina.  Really, it's December 15, and there were little girls in my neighborhood laying on a blanket in the grass in jeans and t-shirts with bare feet.  I'll take that over +/- 30 degree days in Pennsylvania any day.

Back to this post's topic - I'm actually baking Christmas cookies this year.  I don't think I've done this since I lived at home.  I've also canned some goodies for friends and relatives and am in the process of making some rustic felt gift bags to pack them in.  In my next post, I'll share, I promise.  There's also the slowly shrinking list of gifts to buy and last minute preparations next week...stay tuned for more interesting (or not) information as I figure out how this whole blogging thing works :)